Over the years, the Blumat automatic watering system has earned a cult-like following among indoor cannabis cultivators. The ingenious design works with a series of interconnected ceramic stakes, all powered by gravity, to make watering a breeze.
The beauty of Blumat is the highly customizable nature of the system. Expansion or adjustment is simple from one crop to the next, making it perfect for ever-expanding cannabis grows.
Being infinitely customizable also leads to a tricky first-time setup, especially for those who are not familiar with drip irrigation. . If you have a lack of experience using Blumat for indoor cannabis cultivation, you will benefit from a quick walk-through.
If you prefer visual content check out our YouTube channel here.
Introduction to Blumat Automatic Drip Irrigation System
Blumat is an automatic irrigation system that relies entirely on gravity, eliminating the worry of power outages and high electric bills. When properly installed, water moves from the reservoir and through the lines to provide plants with the perfect moisture level —all day, every day.
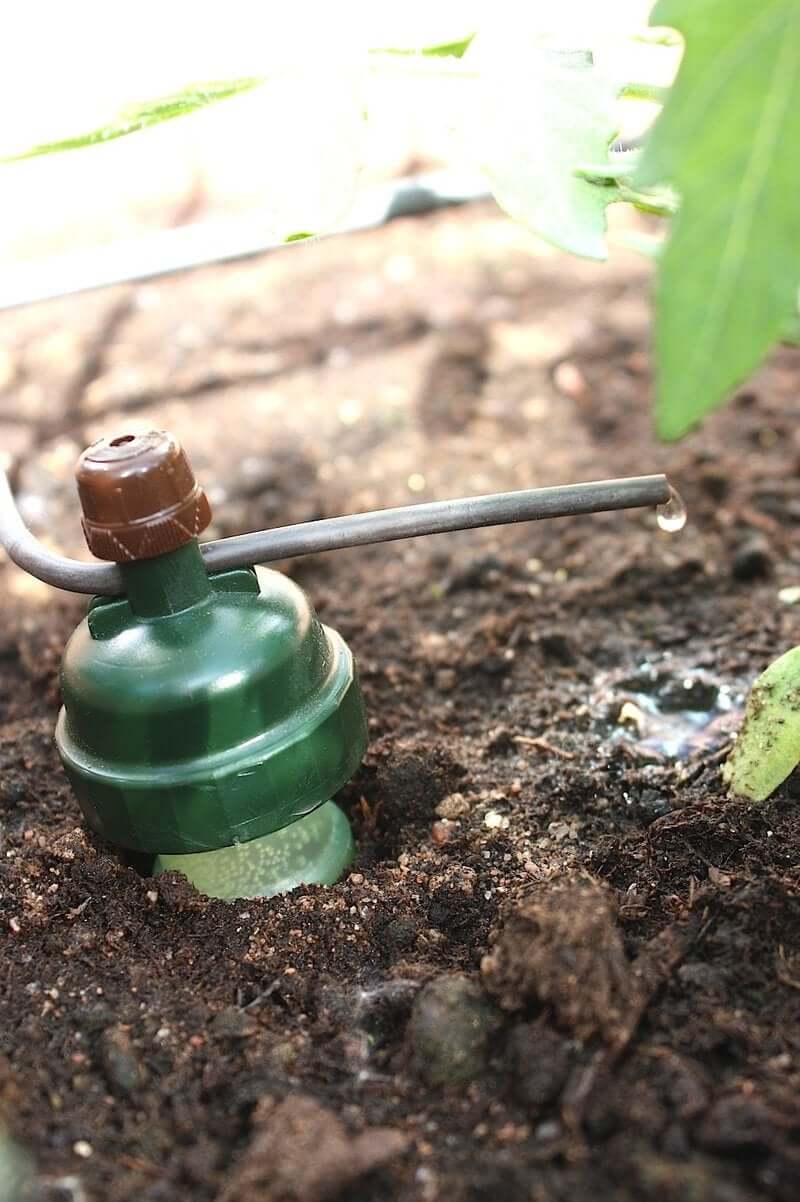
The system involves a series of 'carrots,' which are ceramic stakes inserted beside each plant. These carrots pull water from the reservoir (using vacuum and hydro-static pressure) to maintain a consistently moist environment around the root system of your plants.
The system is entirely customizable depending on the number of plants, moisture requirements, and the cultivator’s preferences. Cannabis growers enjoy Blumat for the reduction of their daily workload. Plants also love it, as they have constant access to their ideal amount of water. Beyond cannabis, Blumat systems are also great for vegetable gardens, raised beds, and house plants.
What You'll Need to Get Started
What you’ll need to build your own custom Blumat irrigation system for indoor growing:
- Blumat carrots (1 per growing container)
- 8mm tubing (enough to connect the reservoir to every carrot)
- 8mm shut-off valves (1 at the reservoir & 1 at the end of the system)
- 8mm fittings (for customizing your layout)
- Reservoir (1)
Blumat Pre-Built Kits
Some people may not be interested in picking and choosing each individual part of their Blumat setup. To make it easy, a variety of Blumat pre-built kits are available. These bundles include everything you need to grow anywhere between 5 and 50 plants!
Step-by-Step Installing Blumat for Cannabis
While every Blumat watering system will vary slightly, most of the design principles will remain the same. The steps below can be altered and adapted to the needs of your grow.
-
Connect Blumat to Water Supply
Before getting started with plants, set up your Blumat irrigation tubing and reservoir. Blumat systems work with a reservoir (such as a 5-gallon bucket) or connect directly to a water supply, like a hose or tap. Place reservoirs at least 3 feet over the soil levelto ensure the gravity-fed system functions properly. Connect one end of the hose to the water source and lay the rest throughout the grow. You'll need to install one carrot per container, so ensure the 8mm tubing runs alongside each container.
Tip: Most growers recommend sticking with a reservoir as a failsafe against serious damage. If the system fails, the worst-case scenario is cleaning up the reservoir’s water. If you decide to attach directly to a hose, you'll need to purchase a hose spigot pressure reducer (sold separately).
-
Pre-Soak the Carrots
Remove the cap from each Blumat carrot before soaking them in a water bucket for at least 15 minutes. Once soaked, ensure every carrot is filled with water before reattaching the lid.
-
Plant Cannabis and Water Thoroughly
Plant your cannabis plants into each container. Water your containers thoroughly the night before and once more before you insert the carrots.
Tip: Once inserted, do not move the carrots. Accidental nudging or adjusting of carrots after setting the system can lead to air bubbles, which may cause the system to fail.
-
Insert the Carrots
Insert one pre-soaked Blumat carrot into each container. Aim to place the carrot within a few inches of the plant's base but more than one inch out from the side of the container. This ensures the carrot receives an accurate moisture reading.
-
Attach Blumat Carrots to Tubing
Using the tee-splitters, attach the other end of the carrot’s 3mm tubing with the primary feeder (8mm) hose. You'll have to cut the 8mm hose to insert each tee spitter. At the end of the line, you'll finish with an elbow fitting and the last carrot.
-
Turn on the Water
Each carrot has an adjuster at the top. Ensure these are all firmly in the off position (turn clockwise) before turning on the water. When you turn the water on, there should be no water dripping from the system.
-
Adjusting the Blumat System
Starting with the carrot located at the end of the line, open the dial (turn counter-clockwise). Water will flow from the end of the drip feeder. Very slowly, turn the dial clockwise until the water flow slows down to a single hanging drip at the end of the line. Turn the dial twice more (two arrows clockwise) to finish setting the carrot.
-
Repeat With Each Carrot
Working backward through the line towards the reservoir, repeat Step 7, one carrot at a time.
Tip: Check the system daily for the next two weeks to ensure each plant is getting enough water. Adjust each carrot as needed by one arrow at a time (open or close).
Troubleshooting Blumat Drip System for Cannabis
Here are a few tips and tricks straight from cannabis-cultivators who have already worked out the kinks of using Blumat for cannabis cultivation:
- Bleed the System of Air During Set-Up: Air bubbles can lead to problems with your Blumat setup. When you first construct your system, let the water run through it for 30 seconds or more to remove any air bubbles.
- Never Let the Reservoir Run Dry: Once the reservoir runs dry, you'll need to completely set up the system once again (pre-soaking carrots, adjusting each carrot). It can also lead to air bubbles.
- Choosing Reservoir Size: Your reservoir size should accommodate the number of plants and their stage of growth. When flowering, each plant may require two or more gallons of water every day. Multiply that by the number of plants and how frequently you want to fill the reservoir to find the reservoir's correct size. Keep in mind, if the system fails and the carrots never turn off, you may have to clean up a reservoir-sized mess.
Solve Watering Woes for Good With Blumat
Once set up, the Blumat watering system is a dream for automatic cannabis irrigation. But, when the package of tubing, carrots, and components arrives in the mail, the setup can definitely feel daunting. Just remember to take your time with the setup to achieve the best results.

Author | Chris McDonald
With two decades of expertise, Chris leads Happy Hydro in redefining sustainable gardening and delights in backpacking adventures, mind-expanding journeys, and creating memories with his loved ones.


